Now people seem to think that just because your compost ingredients look like s*%$t that means you can go ahead and treat it like s%#@t. Hiding and neglecting it. Holding your nose, turning away and cursing it whenever you are forced to face it! Then hoping that it’ll magically transform overnight into something beautiful.
- 1. small twigs & leaves
- 2. lawn clippings
- 3. animal manure
- 4. paper & cardboard (wax-free)
- 5. food scraps/ garden waste
- 6. soil from site (not essential, but of you have it, use).
- 7. blood & bone, lime, fertiliser, seaweed, crushed egg shells.
1. Adds carbon and texture. Also helps raise pile to aid airflow.
2. Can contain over 50% lawn clippings as this is the main ingredient of a rapidly maturing pile. Sometimes in only 4 months. A pile of freshly cut grass for some strange reason of nature will within a day or two heat up to near 100 degrees, and can even catch on fire! It is this process we are taking advantage of, actively cooking the compost instead of just leaving it to slowly and stinkily rot away. You can have a few layers of grass to ensure this, and if there is plenty in the middle of the pile it will cook from the inside out. You can also cover the outside with grass, to make it neater, keep out vermin (although if it’s cooking properly they’ll stay out anyway) and to insulate it to keep it cooking.
3. Manure also helps to get your compost “cooking” and it adds valuable Nitrogen. You can buy manure but there are also lots of free ways of tracking some down. Friends with animals? A farm nearby?
5. Food scraps add a range of nutrients. To give you enough to make your compost pile, you could store it in a bin in your backyard, then use once you have enough.
6. Adding a little soil to the pile provides needed soil bacteria.
7. There are different products you can add if you are really keen to add trace minerals. These also really help to catalyse the whole process. Seaweed and crushed egg shells are natural and readily available sources. (Don’t worry about washing seaweed, just put it in, maybe cut it up a little? And with egg shells we leave them to dry a few weeks before crushing – these are also great to spread around seedlings, slugs and snails don’t like walking over them. Egg shells add Calcium to your soil, among other things – Emm ).
Method: Add the layers in the suggested order (exact order is not essential). Making sure they are to a reasonable thickness, not just a sprinkle, especially the grass! The compost should have the highest ratio of 2, lawn clippings, then roughly equal amounts of 1, 3, 4, 5, 6 and just a sprinkle of 7 on a couple of layers.
It also needs to be kept moist. So give it a sprinkle of water every once in a while. Too wet and it will cool down and not cook. Too dry and it may get too hot and spontaneously combust!So for these bugs to carry out this work, they need to drink…just like us! Your pile also needs to keep warm to keep cooking, so layer those lawn clippings on thick as the final layer and if it’s really wet where you live (hmm all of NZ in winter!!) you can cover the pile with an old sheet/ or plastic to keep out excess water.
Now it will cook for some weeks/months and can be helped along by turning it over every 3-4 weeks (yep getting that pitch fork into it), to give the bugs more easy food to reach. Heat will do most of the work (and keep away vermin, i.e Ants and Rats) but once it has cooled, bugs and worms etc will move in for a month or two to finish the job off….and vola! You will then have yourself some seriously good nutritious compost for that garden of yours.
Happy gardening! Any further questions, ask away and we will do our best to offer advice ~Ben.
Thank you Brother Ben, my compost Guru Xxx ~Emm
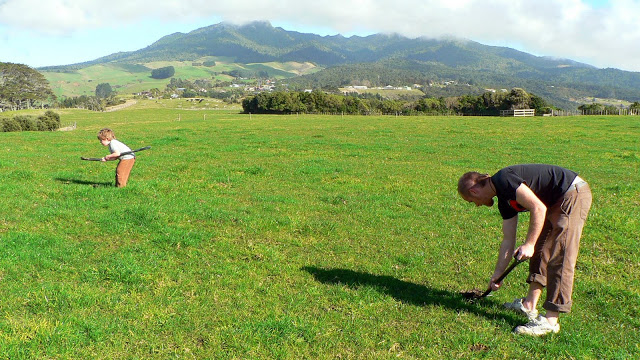
Many thanks to my sister Jessie for taking this lovely photo of the boys collecting cow poo!


I love that you wrote this column. It brings back some good memories of my first serious encounters with ‘real gardening’. There is nothing like really good compost and what it can do for a garden. I find a lot of people don’t understand that the dirt is what it is all about when you want a truly healthy, beautiful garden. You have to start there. I get a lot of stares. But at some point it clicks or you give it up and go back inside.
This column well-written and entertaining should truly inspire.
Your pictures are great. Thanks so much for sharing. I’m really enjoying my visits with you and your family.
Thank you so much Helen Glad you liked it, gardening is in our Galloway genes, but there is always so much more to learn! I find my nana (along with brother Ben, mum and Dad) an invaluable source of information regarding soil balance. It really is the key to a good garden. I think thats why a lot of people give up after their first season, once all the nutrients have been used up. I’m so haapy to see gardening has come back into fashion, long may it live on!
Oh I was hoping for a magic solution. It still sounds like a bit of work but at least I kinda understand it better now! Just too lazy still I guess. And my compost is too far gone in the wrong direction. Starting from summer I’ll get it right!
hehe yep still invloves a wee bit of work, but your garden will love you for it! At a pinch you can always just make sure that you add lots of layers of lawn clippings to your food scraps, 50 % is ideal, even more. It just takes alot longer to break down and wont be quite so nutrient rich. Thats all we had been doing before Ben’s compost makeover, and it actually wasn’t all that bad. You ever thought of having a worm farm? They could eat through your food scraps no worries, and then benift your garden too? It’s on my list of things to do……….